EVE-NG Lab Scenario
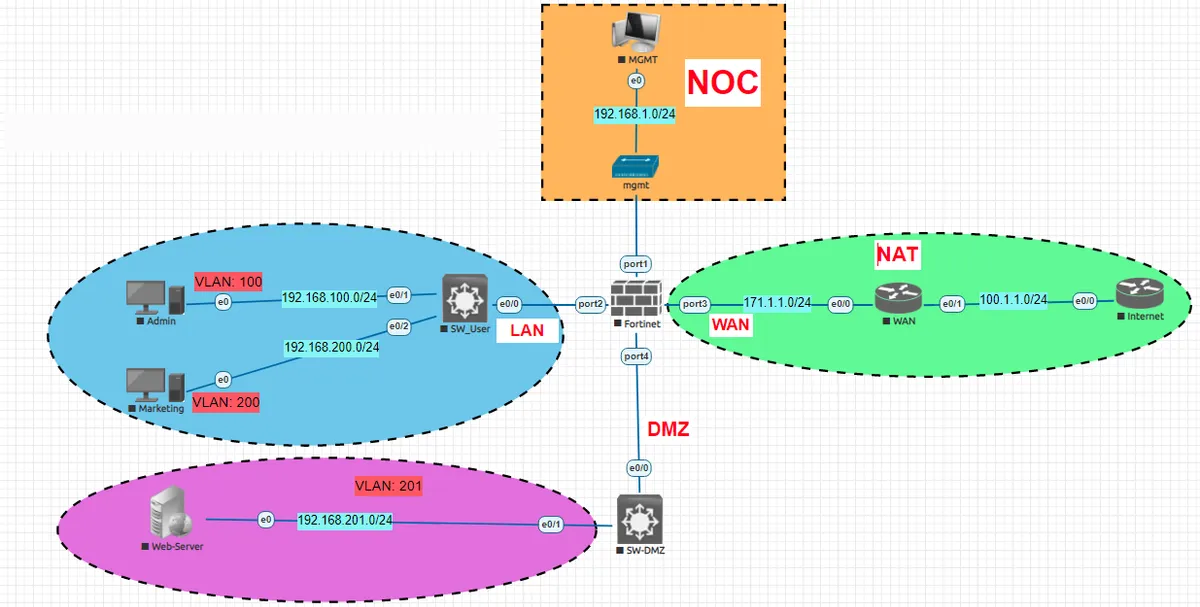
We will implement the structure you see above using the EVE-NG Full Package provided to us by labimage.com.tr. We would like to point out that the structure we will implement in this scenario has no difference in real life scenarios. In this scenario, we will explain the initial installation of Fortigate Firewall, its settings, Web Server and Switch settings.
Fortigate Interface Configuration
FortiGate-VM64-KVM login: admin Password: You are forced to change your password. Please input a new password. New Password: Admin@123 Confirm Password: Admin@123 Welcome! FortiGate-VM64-KVM# FortiGate-VM64-KVM # config system interface FortiGate-VM64-KVM (interface) # edit port1 FortiGate-VM64-KVM (port1) # set mode static FortiGate-VM64-KVM (port1) # set ip 192.168.1.2/24 FortiGate-VM64-KVM (port1) # end
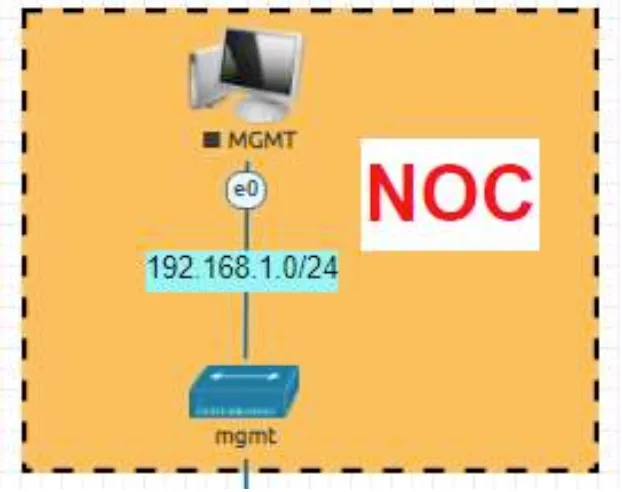
We give a fixed IP address from the network address 192.168.1.0/24 to the computer we allocated for Management in our scenario. Afterwards, from the internet browser, we go to http://192.168.1.2, the IP address we fixed on our Fortigate Firewall above.
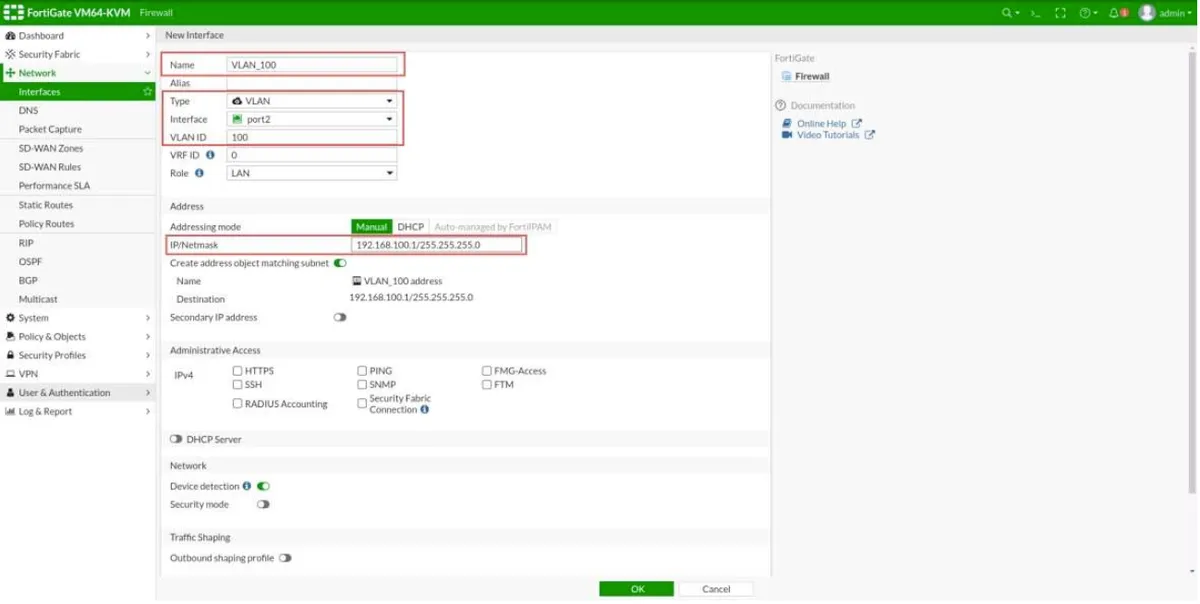
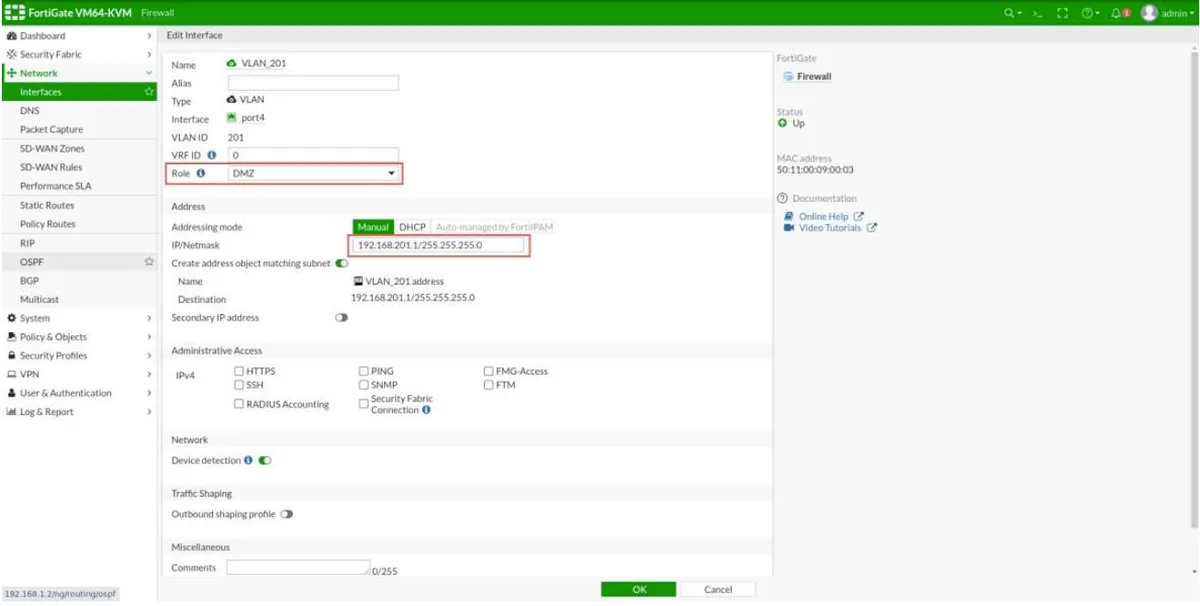
Then we select Network --> Interfaces --> Create new --> Interface from the menu on the left. Here we will create our VLANs in the structure you see above. It will be enough to pay attention to the places boxed in red in the pictures below.
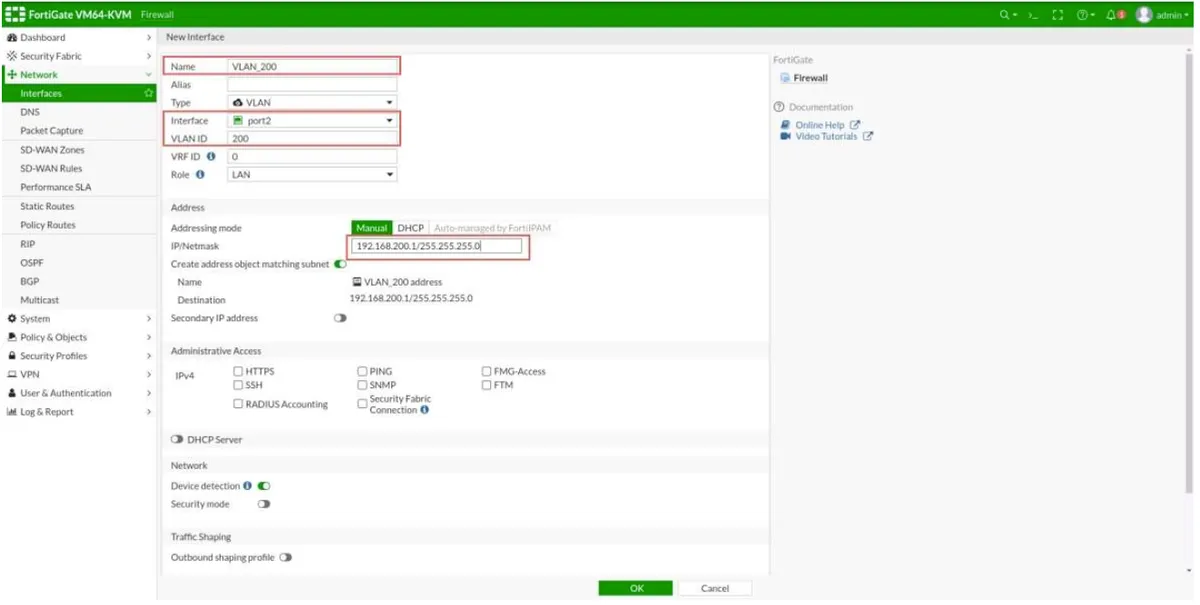
Similarly, we configure the VLAN that we will use for DMZ.
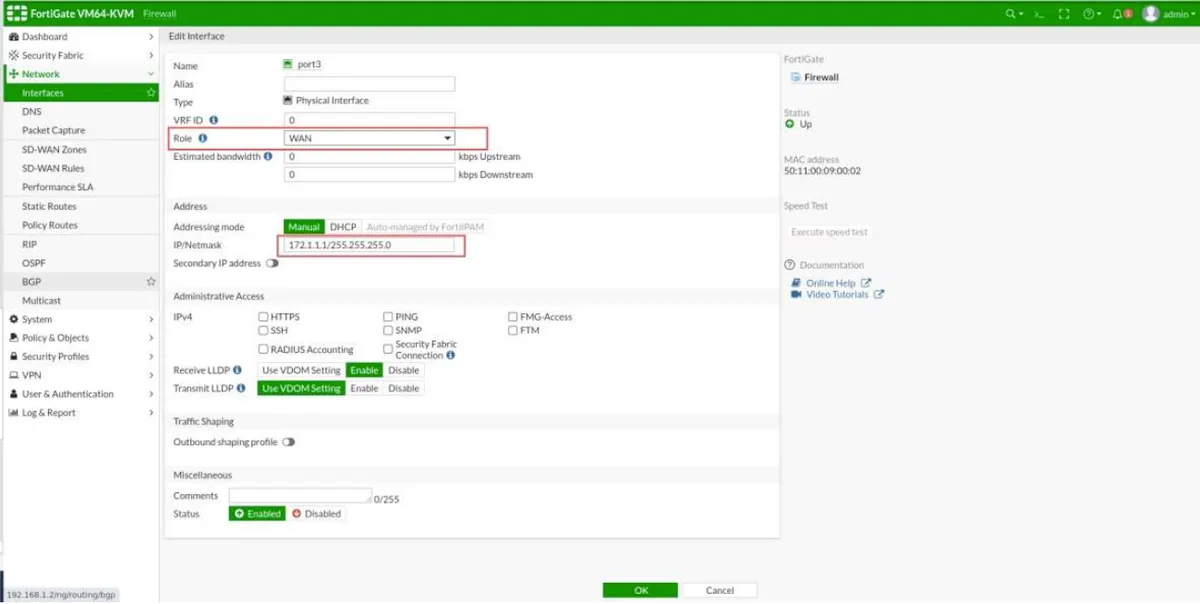
Since we will connect our internet (WAN) leg to port 3 of our Fortigate, we configure our fixed IP address that we get from our service provider. .
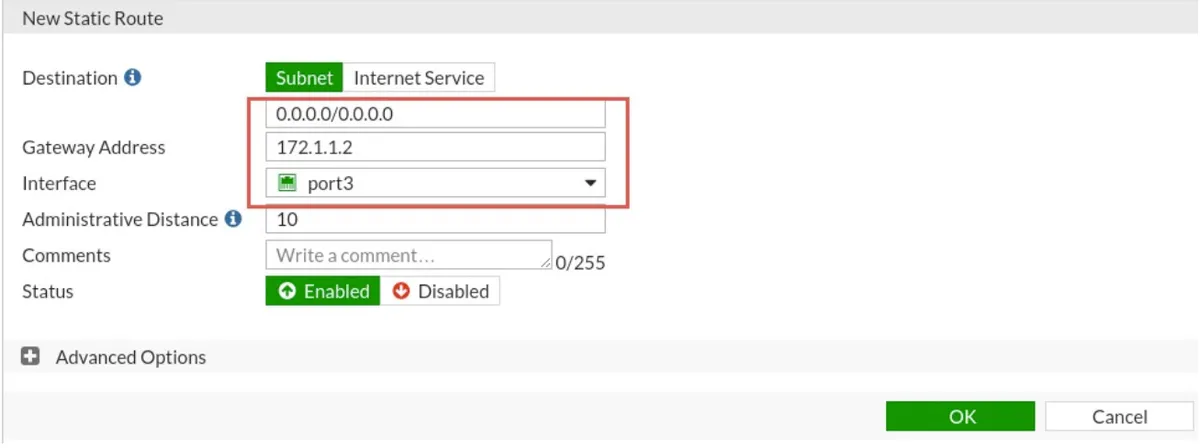
Now, we configure our default route for the WAN leg to our internet output by clicking Network --> Static Routes --> Create New.
Cisco Switch Configurations
Our Cisco switches have previously prepared settings such as hostname and vlan, but we need to configure their ports and vlans. For this, first of all; Configuration of our switch named SW_User; hostname SW_User ! interface Ethernet0/0 switchport trunk allowed vlan 100,200 switchport trunk encapsulation dot1q switchport mode trunk ! interface Ethernet0/1 switchport access vlan 100 switchport mode access ! interface Ethernet0/2 switchport access vlan 200 switchport mode access SW_DMZ Configuration; hostname SW_DMZ ! interface Ethernet0/0 switchport trunk encapsulation dot1q switchport mode trunk ! interface Ethernet0/1 switchport access vlan 201 switchport mode access After making the port and vlan settings of our switches above, we move on to our Router and NAT configuration.
Cisco Router Configuration
WAN ROUTER; hostname WAN ! interface Ethernet0/0 ip address 172.1.1.2 255.255.255.0 ip nat inside ! interface Ethernet0/1 ip address 100.1.1.1 255.255.255.0 ip nat outside ! ip nat inside source list NAT interface Ethernet0/1 overload ! ip route 0.0.0.0 0.0.0.0 100.1.1.2 ! ip access-list standard NAT permit any INTERNET ROUTER; hostname INTERNET ! username admin privilege 15 password 0 admin ! interface Loopback0 ip address 8.8.8.8 255.255.255.255 ! interface Ethernet0/0 ip address 100.1.1.2 255.255.255.0 ! ip http server ip http authentication local
Web-Server Configuration
hostname Web-Server ! username admin privilege 15 password 0 admin ! interface Ethernet0/0 ip address 192.168.201.2 255.255.255.0 ! ip http server ip http authentication local ip route 0.0.0.0 0.0.0.0 192.168.201.1
Creating a Fortigate Policy Router
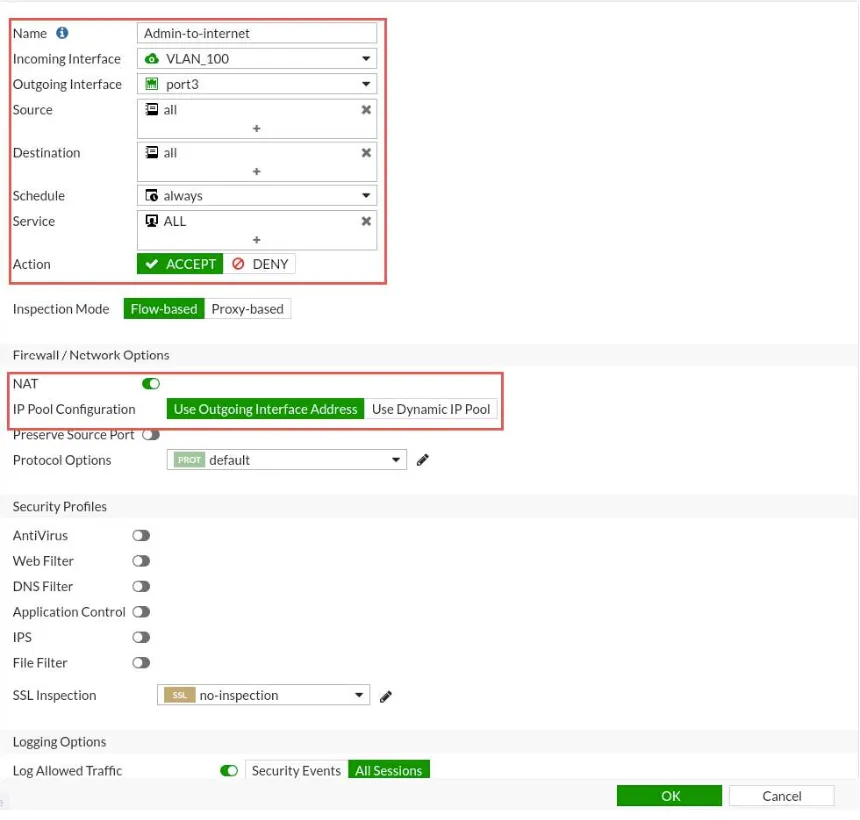
From the Policy & Object Menu, click Firewall Policy --> Create New Our first rule is to create a permission rule for the Admin computer to access the internet. Pay attention to the places marked in the box in red.
Now we create the permission rule for the Marketing department to access the internet.
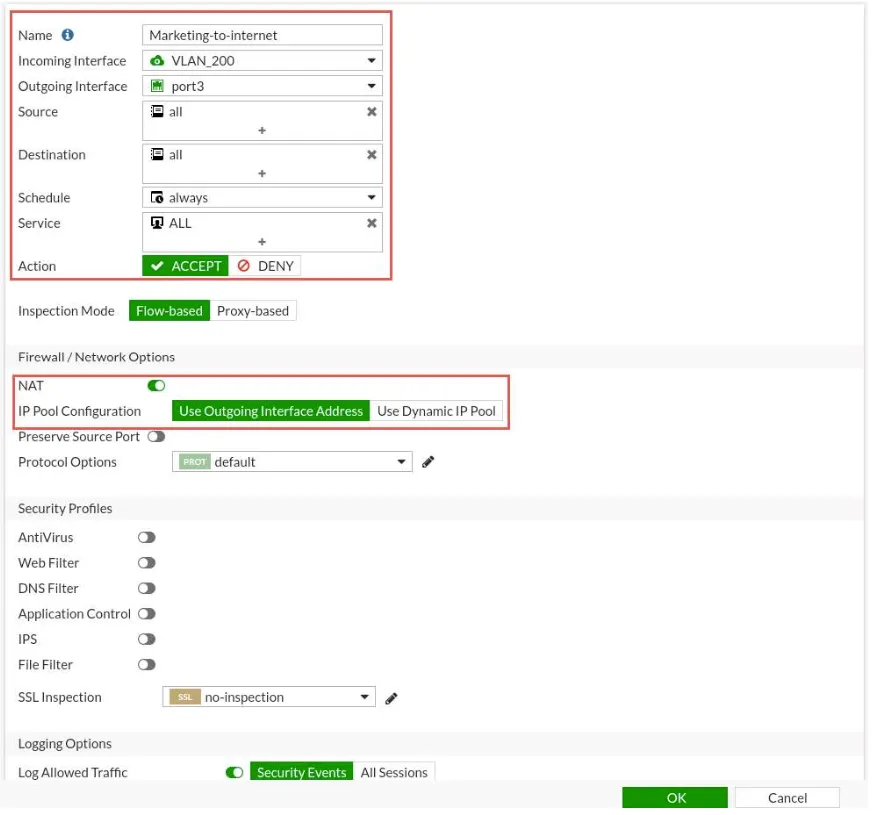
After creating these two rules on the Fortigate firewall, Admin and Marketing computers should now be able to access the internet. For this, we need to be able to ping 8.8.8.8 or www.google.com addresses through these computers.
Now, by adding a new rule, we ensure that the Admin computer can access our Web-Server.
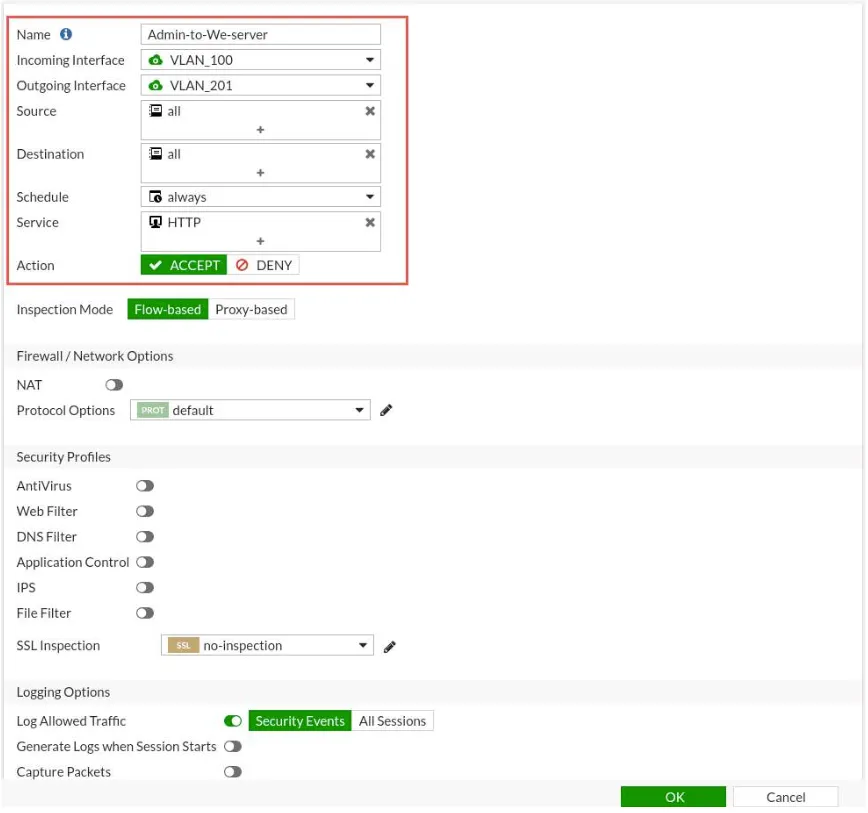
After this rule, the Admin computer can access our Web-Server via port 80. We need to be.
The scenarios created using EVE-NG not only prepare us quickly for real-life situations but also allow us to observe how the structures function in practice. This is made possible by the EVE-NG Full Package, crafted by the team at labimage.com.tr.